Thursday, February 28, 2013

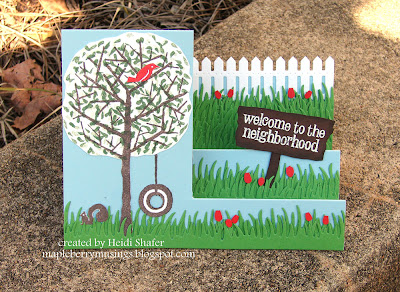
Welcome to the neighborhood

Boy, it's been an adventure trying to get this posted today!!  My internet connection keeps going out.  Technology is both a blessing and a curse sometimes.

Here's my final card for the Love Fest challenges at Splitcoaststampers!  This one was sponsored by Scor-Pal (found here) and we had to make a card with multiple folds.  I decided to try a stair step card and here is the result.  I posted plenty of pics so you can see the details.   :)


I had so much fun creating this card.  For my first attempt at the stair step card, it came out really great!  I used Spring Rain cardstock for my base and added multiple strips of grass on each step.  (I do mean multiple.  There are eleven of them counting all the layers!) I stamped and cut out the tree on white cardstock, and used the generational stamping technique for the leaves.  The bird, squirrel and tree swing are also cut out.

I added a strip of picket fence to the back step and a cute welcome sign to the middle step with an embossed sentiment.  It's also sponged to look more like wood.  I used the Tulip Garden punch with both Leaf Green and Poppy Parade cardstock, cutting off the red tulips and gluing them in place on the green.  Then each tulip sprig was placed individually in the grass strips.  Very time consuming process, but I love how it adds pops of cheerful color.  It totally makes the card!

I sure wouldn't mass-produce this card since it took me hours to make it.  It's one of my favorite cards I've ever made though!  I really had no clear vision when I started.  It was fun to experiment as I went along and see it evolve.

Stamps:  Trees & Things, Around the Block (Close to My Heart)
Paper:  Spring Rain, New Leaf, White (Papertrey Ink); Poppy Parade (Stampin' Up)
Ink:  Dark Chocolate, New Leaf (Papertrey Ink); Poppy Parade (Stampin' Up); VersaMark
Misc:  Picket Fence die, Fresh Cut Grass die (My Favorite Things); Tulip Garden edge punch (Martha Stewart); white embossing powder (Filigree)  
Paper:


Wednesday, February 27, 2013

Skunk love

One more card to post today.  (This has to be a personal record!)  I would have posted a couple yesterday, but it rained nonstop and I couldn't get a decent picture.  Today we had glorious sunshine!  This card is for the Splitcoaststampers Love Fest challenge sponsored by The Greeting Farm.  (found here)  They have some very cute stamps, although I only have a few.  This particular image is actually digital, not a rubber stamp.  It's perfect for the challenge to create a love-themed card using dies.


It may look like a simple card, and it is as far as design goes, but it took quite a while to finish due to all the coloring.  I used my Copic markers and thoroughly enjoyed myself like I was back in elementary school again.  I used a distress tool along the edges of the white cardstock to add some texture.  The sentiment is stamped on a heart diecut and layered on a scalloped heart.  Very simple, and oh so sweet!

Stamps:  Bertie Valentine digi (The Greeting Farm); Mixed Messages (Papertrey Ink)
Paper:  White, Pure Poppy (Papertrey Ink)
Ink:  Tuxedo Black (Memento)
Copic:  0, C1, T1, T4, T6, BV29, R20, R30, R24, R29, R59, YG93, E55, E57, E59, E30, E42
Misc:  Classic Hearts die, Classic Scalloped Hearts die (Spellbinders); distress tool 

Mini thank you

Taylored Expressions sponsored a Love Fest challenge at Splitcoaststampers and asked us to created a card set sized 3x3 inches or smaller.  This was a first for me!  Other than gift tags, I don't think I've ever created cards this small.  It was actually pretty fun!


Aren't they cute?  I made three teeny cards using a scalloped rectangle die by Spellbinders.  (finished size about 2-1/2 inches square)  I've had this stamp set by Taylored Expressions for a while, so it's about time I used it!  The scene was created using four different stamps, and my stamp positioner tool got a lot of use to do it.  Very handy to have around.  :)  I spent the most time coloring the cards with Copic markers.  Love how they turned out!

Stamps:  Branching Out (Taylored Expressions)
Paper:  White (Papertrey Ink)
Ink:  Tuxedo Black (Memento)
Copic:  0, C1, T1, T4, T6, B42, B45, B37, E55, E57, E59, YG11, YG13, YG15, Y11, Y13, Y15, R24, R29
Misc:  black Pigma Micron .01 pen  

Flowers are the music of life

The next Splitcoaststampers Love Fest challenge is a sketch.  (found here)  It's a very versatile layout and resulted in this card.  I really like it!

 
I chose to use earthy colors this time.  I embossed the Canyon Clay piece with a cool diamond pattern and it adds a rich texture to the card.  The patterned paper is from an older 6x6 pad by Basic Grey called Green at Heart.  I layered everything with Dark Chocolate cardstock.  The sentiment is stamped on a Vintage Cream oval, and the flower was created using both Canyon Clay cardstock and Vintage Cream that was stamped with the matching ink.  A dark metallic brad holds it all together.

Stamps:  Beautiful Blooms II (Papertrey Ink); Floral Symphony (Verve)
Paper:  Canyon Clay, Vintage Cream, Dark Chocolate (Papertrey Ink)
Ink:  Canyon Clay, Dark Chocolate (Papertrey Ink)
Misc:  Beautiful Blooms II #3 dies, Double-Ended Banners die (Papertrey Ink); Standard Ovals Large die, Classic Scalloped Ovals Large die (Spellbinders); Diamonds in Diamonds embossing folder (Sizzix); Metallic Basics brad (Making Memories)  

Hello sunshine

This card is for the Love Fest challenge sponsored by Verve Stamps over at Splitcoaststampers.  (found here)  This time, it's a color challenge using either aqua/brown/pink or aqua/brown/yellow.  Obviously, I chose the latter.   :)


So pretty and cheerful!  Even the sun was overly bright when I took the picture.   lol  I embossed the aqua cardstock with a cool swirl design by Tim Holtz.  It almost gives the feel of clouds in the sky.  Then I embossed the brown cardstock with polka dots.  (yes, I do use that folder a lot!) 

I stamped the sun image on a white circle and sparkled it up with some gorgeous yellow glitter.  I layered it on a yellow inverted scalloped circle to further reinforce the sun theme.  I stamped my sentiment on a fishtail flag, and put it all together on a white card base.  Voila...a card that would brighten anyone's day!

Stamps:  Let It Shine (Verve Stamps)
Paper:  White, Aqua Mist, Dark Chocolate, Lemon Tart (Papertrey Ink)
Ink:  Dark Chocolate (Papertrey Ink)
Misc:  Fishtail Flags STAX die (My Favorite Things); Standard Circles Small die, Classic Inverted Scalloped Circles Small die (Spellbinders); Swiss Dots embossing folder (Cuttlebug); Swirls embossing folder (Tim Holtz Alterations by Sizzix); Lemon Drop glitter (Martha Stewart)

Pieced Easter Eggs

For this particular Love Fest challenge over at Splitcoaststampers, we had to use items that started with the letters L.O.V.E.  (found here)  I struggled quite a bit with it.  Not as easy as you would think!  Eventually, I settled on these components:

L - Lucky Limeade cardstock
O - one butterfly, old scraps
V - Very Vanilla cardstock
E - Easter eggs


I have had these paper-pieced Easter eggs sitting in my scrap drawer for a couple of years.  I just could never get them to work on a card.  This time I was determined to do it!  They were created by cutting strips of patterned paper and gluing them side by side on white cardstock.  Once dry, I diecut the egg shapes using a Spellbinders die.

For my card I layered Very Vanilla cardstock on a Lucky Limeade card base, and then added a piece of Almost Amethyst that was embossed with polka dots.  I cut a strip of grass using Lucky Limeade and placed my eggs both in front and behind the grass.  For a last touch, I stamped a butterfly and cut it out.  It makes a sweet Easter card!   :)

Stamps:  Butterfly Dreams (Papertrey Ink)
Paper:  Almost Amethyst, Very Vanilla, Lucky Limeade (Stampin' Up); 8x8 Slab (Provo Craft)
Ink:  Almost Amethyst (Stampin' Up)
Misc:  Swiss Dots embossing folder (Cuttlebug); Nested Eggs die (Spellbinders); Fresh Cut Grass (My Favorite Things)


Monday, February 25, 2013

Peonies and monograms

Hey there!  I'm participating in the Papertrey Ink monthly blog hop today, along with a Splitcoaststampers Love Fest challenge to use dies.  (found here)  The blog hop challenge had me stumped a bit.  Here it is:

Pull out your letter stamps and alphabet dies and create something monogrammed!  It can be a gift for someone special or a treat to keep for yourself!  You could monogram a set of notecards, stationery, coasters, journals, home decor or anything else you can dream up!  Have fun and experiment with combining different fonts, pairing up stamped & die-cut letters, pull-out neglected patterned papers to use as backgrounds, add texture with impression plates and you can even play around with with unique color combos!  We can hardly wait to see what YOU create!

I wasn't really sure where I wanted to go with it.  Card?  Notepad?  Whose initials?  After some thinking and playing around with my dies, I finally settled on this pretty little design.


Love it!  It's so elegant and classy.  I dry-embossed the background with a simple polka dot pattern.  I heat-embossed the peony and leaves in black, which really pops against the bright colors.  Then I layered two die shapes from Pretty Peonies, stamping the matching frame on top.  I stamped the black initials, putting the pink diecut letter in the center.  Love the look!  I used my own initials, so I get to use this pretty card for whatever I want.   :)

Stamps:  Pretty Peonies, Fresh Alphabet (Papertrey Ink)
Paper:  White, True Black, Hibiscus Burst, Limeade Ice (Papertrey Ink)
Ink:  Tuxedo Black (Memento); Black (VersaColor)
Misc:  Pretty Peonies dies, Block Alphabet Upper die (Papertrey Ink); Swiss Dots embossing folder (Cuttlebug); Silhouette Black embossing powder (Embossing Arts Co)


Saturday, February 23, 2013

Thinking of you

One of my friends requested a sympathy card, so I used the colors from one of the Splitcoaststampers Love Fest challenges.  You can see the inspiration pic and color scheme here.  I don't have any Unity stamps, so I pulled out an oldie-but-goodie Verve set called Petals & Stems.


I stamped my own background paper using each part of the flower in a different color.  (a nod to the inspiration pic flowers)  I also cut out one of each layer for the main panel's flower, stamping the stem in Chocolate Chip ink, and then layering the petals for dimension.  I kept the rest of the card design simple to let the colors shine.  Inside, I stamped another sentiment and matted it with a scalloped Chocolate Chip layer to match the front of the card.

Stamps:  Petals & Stems (Verve); Pond Life (Papertrey Ink); Thoughts & Prayers (Stampin' Up)
Paper:  White (Papertrey Ink); Chocolate Chip (Stampin' Up)
Ink:  Pumpkin Pie, Daffodil Delight, Island Indigo, Chocolate Chip (Stampin' Up)
Misc: Classic Rectangles Large dies, Scalloped Rectangles Large dies (Spellbinders)  

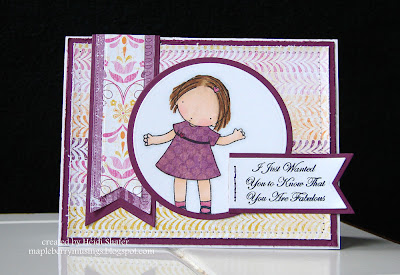
You are fabulous

I finished this card last night for another one of the Splitcoaststampers Love Fest challenges (found here) and finally have some time to post it.  My Favorite Things sponsored a challenge to make an encouragement card, so I pulled out this cute little Pure Innocence girl.


Isn't she sweet?  I colored her with Copic markers and then used some pretty patterned paper to paper-piece her dress.  I used other prints from the same series for the rest of the card.  The bottom layers were distressed along the edges and then stitched together using my sewing machine.  I also stitched on the sentiment flag with a darker thread.  Rich Razzleberry is such a gorgeous color!  It looks fantastic with the Razzleberry Lemonade patterned paper.  (it's retired now, unfortunately)  I love this card.  I think it would brighten anyone's day.   :)

Stamps:  Aim High, Flower Silhouette (My Favorite Things)
Paper:  White (Papertrey Ink); Rich Razzleberry, Razzleberry Lemonade dp (Stampin' Up)
Ink:  Tuxedo Black (Memento)
Copic:  0, E000, E00, E30, E42, R20, R83, R85, BV29, E55, E57, E59, C1 
Misc:  Standard Circles dies (Spellbinders); Fishtail Flags STAX dies, Fishtail Flags Layers STAX dies (My Favorite Things); distresser tool 

Friday, February 22, 2013

Bookwormabella with a touch of bling

This card is for another Love Fest challenge at Splitcoaststampers, this time sponsored by Stamping Bella.  I have several of their cute Bella stamps and have my eye on some of their Uptown Girls as well.  So adorable!  The challenge is to use bling in whatever form you like.  You can find the challenge here.  For my card, I also used Freshly Made Sketches #74.  Such a great, simple layout!  (found here)


As you can see, I used only small amounts of bling so it wouldn't overwhelm the card's simple design.  There is a small pink rhinestone in bookwormabella's hair and three larger rhinestones in the lower right corner.  If you click on the second picture, you will also see that I added glitter to her yellow top.  (one of my favorite ways to add sparkle!)

I cut a white layer with the Top Note die by Stampin' Up and then stamped/colored this adorable bookwormabella image.  I was thinking of my sister the whole time, since she is an avid book reader.  Thus the brunette hair.  I used Copic markers, of course.  Don't you just love the girly pink book she's holding?   :)

I cut a fishtail flag from Soft Stone cardstock and then stamped my sentiment from a My Favorite Things set called Clearly Sentimental About Books.  I even broke out the sewing machine to stitch it on!  I love how it looks, plus it balances the line of pink rhinestones at the bottom.  Inside the card, I stamped another sentiment from the same set.

Now to actually mail this to my sister!   :)

Stamps:  bookwormabella (Stamping Bella); Clearly Sentimental About Books (My Favorite Things)
Paper:  White, Lemon Tart, Soft Stone (Papertrey Ink)
Ink:  Tuxedo Black (Memento)
Copic:  0. T1, T4, E000, E00, E30, E55, E57, E59, R20, Y11, Y13, Y15, RV04, RV13, YG13, YG17, B41, B45, B37
Misc:  Top Note die (Stampin' Up); Fishtail Flags Layers STAX die (My Favorite Things); rhinestones (Marcella by K); Crystal fine glitter (Martha Stewart)  


Thursday, February 21, 2013

Reach for the stars

Splitcoaststampers is having a Love Fest series of challenges featuring their member companies, so I decided to join in to get myself stamping.  I need to build up my stash of cards.  This particular card is for the challenge sponsored by The Cat's Pajamas.  They provided an inspiration photo which can be seen here.


I started by stamping the small star grouping using silver ink on Smokey Shadow cardstock, adhering it to a Soft Stone card base.  It has a slight shimmer in person.  I punched a circle from Lemon Tart cardstock and then embossed it with the Polka Dots folder.  (reversed to look like craters)  The sentiment is stamped on a Soft Stone fishtail flag.

For the rocket, I stamped it in Tuxedo Black ink and added shading with my Copic markers.  I paper-pieced the fins and jets with silver paper and the circles with Smokey Shadow.  I used Glossy Accents to make the top of the rocket look like a window.  It adds some shine and dimension.  This card was very fun to make!

Stamps:  It's a Mod Mod World (Cat's Pajamas); Stardust & Moonbeams (Elzybells)
Paper:  Smokey Shadow, Lemon Tart, Soft Stone (Papertrey Ink); silver (unknown)
Ink:  Tuxedo Black (Memento); Silver (Encore! Ultimate Metallic)
Copic:  0, T1, T4, T6
Misc:  Fishtail Flags STAX die (My Favorite Things); Polka Dots embossing folder (Cuttlebug); 1-1/2" circle punch (EK Success); Glossy Accents (Ranger) 


Friday, February 8, 2013

Violets

Well, the anniversary festivities are in full swing over at Papertrey Ink as they celebrate six years in business.  Today's challenge is to create a card with one of their Year of Flowers stamp sets.  Since I only have one of the series, it made my choice very easy!  lol  My husband was laid off the year they were all released so I only bought the first one.  The rest are definitely on my wish list though!  I'm excited that PTI is finally releasing matching dies for all of them.


I kept my card fairly simple since I was racing to get it done before I lost daylight.  Since I don't have a light tent, I prefer taking my photos outdoors when I can.  Naturally, if I had more time, I would redo a few things.  The background stamping turned out lighter than I wanted and the white dots look rather out of place as a result.  I still like the card though.

I used Plum Pudding to stamp the violets on a matching card base, masking to add leaves as I went along.  I added subtle shading with a Copic marker.  I think next time I will just shade around the outline and leave it at that.  Maybe it would stand out more.  Either way, I think a darker purple ink would work better.  Oh well!   :)

I stamped the violet and leaves on a strip of white cardstock, adding color with Copic markers, and then stamped the sentiment from the same set.  There is some yellow glitter at the center of the violet.  Subtle, but it really catches the eye.  Hopefully you can see it in the close-up pic.  I layered the strip on Lavender Moon cardstock to complement the lighter purple in the violet.

So there you have it!  If you want to see many projects using the other Year of Flowers sets, go to Nichole Heady's blog here. You can join in the anniversary excitement yourself!  I can't wait to see what else happens over the next week.  :)

Stamps:  Year of Flowers: Violets (Papertrey Ink)
Paper:  Plum Pudding, White, Lavender Moon (Papertrey Ink)
Ink:  Plum Pudding (Papertrey Ink); Tuxedo Black (Memento)
Copic:  0, C1, V91, V95, V99, Y32, Y35, YG11, YG13, YG17
Misc:  Lemon Drop glitter (Martha Stewart); white gel pen (Inkssentials)