Monday, August 31, 2015

Stamp-a-Faire 2015: Red Carpet Challenge

This one isn't really a challenge, per se, but a group photo of the six cards I made during this year's Stamp-a-Faire by Papertrey Ink.  I had hoped to do more, but normal life got in the way.  It's been a busy weekend!  My daughter Emily did two of the challenges with me (t-shirt and bridal), and we enjoyed our time together.


You can click on the links below to see the original posts for each card.  If time had been on my side, I would have gotten a pic of Emily with her two projects as well.

Bridal Challenge

Patterns Challenge (sketch)

Thread Nest Challenge

Twine Techniques Challenge

Stamped & Stitched Challenge

Runway Challenge

Don't forget our t-shirts found on the original post here!   :)

It's been a fun stampy weekend and I'm glad I was able to participate.  I look forward to Stamp-a-Faire every year! 

Stamp-a-Faire 2015: Stamped & Stitched Challenge

I really like this card.  Am I allowed to say that?  lol  I love the color combo and pattern prints I used, not to mention I adore this stamp set, Quilted: Spring.  I still need to get the summer and autumn editions.  This card is for the Stamped & Stitched challenge by Heather Nichols.  Obviously, I used Kraft cardstock in her honor.  :)


I embossed a stitched image from Background Basics: Needlepoint directly on my Kraft card base.  I layered two different patterned papers from the Primrose pad by Bo Bunny.  So pretty!  I stamped the flowers using Close to Cocoa, Rose Romance, and Sweet Blush inkpads.  Having matching dies sure made this easier.  I stamped my sentiment on a white banner and added a stitching line using an image from Button Boutique.  Love the result!

Stamps:  Quilted: Spring, Background Basics: Needlepoint, Button Boutique, Petite Pots (Papertrey Ink)
Ink:  Rose Romance, Close to Cocoa (Stampin' Up); Sweet Blush (Papertrey Ink); VersaMark
Paper:  White, Kraft (Papertrey Ink); Primrose 6x6 pad (Bo Bunny)
Misc:  Quilted: Spring dies, Double-Ended Banner die (Papertrey Ink); white embossing powder (Filigree)

Stamp-a-Faire 2015: Runway Challenge

Woot!  I got another challenge card done!  This one is for the runway challenge, where we were given several high fashion inspiration pictures and color combos pulled from the dresses.  I chose Betsy Veldman's flowery blue and white dress.


I cut 1-3/8" inch wide strips of White, Spring Rain, Blueberry Sky, and Enchanted Evening cardstock and adhered them to a white card base in graduated order.  Using images from Nostalgic Notions, I embossed a large flower and leaves in a random pattern using Denim embossing powder.  I love how different it looks on each strip of color!

I cut my sentiment using the Wonderful Words: Congrats die.  Before gluing it down, I created a thread nest underneath with silver metallic thread.  It subtly frames the word with just a touch of shimmer.  This card is perfect for a wedding.  Now who's getting married?  :)

Stamps:  Nostalgic Notions (Papertrey Ink)
Ink:  VersaMark
Paper:  White, Spring Rain, Blueberry Sky, Enchanted Evening
Misc:  Wonderful Words: Congrats die (Papertrey Ink); metallic silver thread (Coats & Clark); Denim embossing powder (Zing!)

Stamp-a-Faire 2015: Twine Techniques Challenge

I'm popping in to post my card for the twine techniques challenge for Stamp-a-Faire.  Danielle Flanders showed this use of a luggage-style tie with buttons and I thought it would be fun to use with the Wonderful Words: Joy die.  What's cool is that my card also fits the Merry Monday challenge because I used holly!


My son thought I was crazy making a Christmas card this early.  lol  I just laughed.  I'm determined to actually send Christmas cards this year.  I first stamped the holly images from Tinsel & Tags Sprigs on a white card base in a random pattern using New Leaf and Pure Poppy inks.  Then I covered it with a layer of vellum to soften it up.

I used the Happy Heart embossing folder by Stamping Up to create texture on the New Leaf strip.  (My adhesive is hidden behind that.  Vellum can be tricky!)


I cut the word JOY out of white cardstock three times and layered them so it would be sturdier for my twine.  I added red baker's twine with a luggage-style tie to the top and bottom of the O.  I taped down the twine ends inside my card, but there is also a tiny bit of cardstock shim underneath the word to accomodate the bulk of the twine and keep it in place. 

I cut and stamped the holly for my focal cluster, adding Stickles to the berries for some sparkle.  After arranging the pieces, I glued them to the word JOY.

I really like the finished card!  It's a bit bulky for mass mailing, but I have plenty of local friends to hand-deliver some Christmas cheer.   :)

Stamps:  Tinsel & Tags Sprigs (Papertrey Ink)
Ink:  New Leaf, Pure Poppy, vellum (Papertrey Ink)
Paper:  White, New Leaf (Papertrey Ink)
Misc:  Tinsel & Tags dies, Wonderful Words: Joy die (Papertrey Ink); Maraschino baker's twine (The Twinery); Frosted Lace Stickles, Decorative Dots embossing folder (Stampin' Up) 

Saturday, August 29, 2015

Stamp-a-Faire 2015: Thread Nests Challenge

The third Stamp-a-Faire challenge has a tutorial for making thread nests.  I always wondered how Laura Bassen did it and now I know!


I stamped the stitched-style chevron border from Background Basics: Stitching on white cardstock in graduated colors: Orange Zest, Terracotta Tile, and Pure Poppy.  I really like how it looks!  I got this stamp set several months ago and this is the first time I've used it.  It won't be the last.  :)

I used gold metallic thread to create my messy thread nest, and then placed my embossed sentiment on Dark Chocolate cardstock over top.  I added some random dots of gold Stickles to finish it off.  I love the touch of sparkle!


This will make a great masculine birthday card, or even for an autumn birthday.

Stamps:  Movers & Shakers Sentiments, Background Basics: Stitching (Papertrey Ink)
Ink:  Orange Zest, Terracotta Tile, Pure Poppy (Papertrey Ink); VersaMark
Paper:  White, Dark Chocolate (Papertrey Ink)
Misc:  Golden Rod Stickles, gold metallic thread (Coats & Clark); white embossing powder (Filigree) 

Stamp-a-Faire 2015: Patterns Challenge

For today's second challenge, we were given twelve Go-To Card Pattern choices.  Sketches in other words, but with measurements and some instructions.  I chose #09, which was designed by Maile Belles.  It really caught my eye!  Emily picked a sketch too, but then got distracted by other things and deserted me.  lol


I used two pretty patterned papers from the Antique Chic pad by We R Memory Keepers for my card background and ground.  I stamped one of the flowers from Bitty Bouquets in Harvest Gold and New Leaf ink on a white diecut.  For my sentiment on the white strips, I divided one up from Inside & Out: Thank You.  I had to do some selective inking to make it work.  Not exactly what the instructions said to do, but close enough to count!  :)

Stamps:  Bitty Bouquets, Inside & Out: Thank You (Papertrey Ink)
Ink:  Tuxedo Black (Memento); Harvest Gold, New Leaf (Papertrey Ink)
Paper:  White (Papertrey Ink); Antique Chic 6x6 pad (We R Memory Keepers)
Mics:  Bitty Bouquets die, Building Blocks die, Initial Thoughts die (Papertrey Ink)

Stamp-a-Faire 2015: Bridal Challenge - Emily

Here is Emily's card for the bridal challenge.  She finished hers before I did, but that's partly because I helped her with the embossing.  She was a bit nervous to use the heat gun.  Besides, she makes design decisions a whole lot quicker than I do!


She heat-embossed two different styles of butterfly from the Butterfly Kisses ad Butterfly Dreams stamp sets.  After layering them together, she added pearls for the butterfly's body.  She stamped her sentiment from Friends 'Til the End in gray ink on a Building Blocks diecut and added two more pearls on each side.  The smaller white panel was embossed with a pretty heart outline pattern.  She then glued everything onto a white card base.

Stamps:  Butterfly Dreams, Butterfly Kisses, Friends 'Til the End (Papertrey Ink)
Ink:  London Fog (Memento); VersaMark
Paper:  White (Papertrey Ink)
Misc:  Butterfly die, Butterfly Kisses die, Building Blocks die (Papertrey Ink); white embossing powder (Filigree); Happy Hearts embossing folder (Stampin' Up); pearls (Paper Studio)

Stamp-a-Faire 2015: Bridal Challenge

Here comes the bride!  The first challenge today is to make a wedding card, using nothing but white supplies.  The only exception is a neutral ink for a sentiment.  Emily and I both made a card for this challenge.  I'll post mine here and then Emily's card in a separate post.


I pulled out my Quick Stitch Sentiment dies and cut the world "love" into a white cardstock panel.  I mixed two strands of white embroidery floss and one strand of white metallic braid.  Once threaded onto a needle, I stitched through the holes the die left behind.  There's a subtle shimmer to the thread that is really pretty.


I cut three pieces of a flower die from Petite Pots, trimming parts from two of them.  I added pearl dots with a Viva pen and then arranged my flowers onto the card into a pleasing bouquet.  The white panels was then added to a card base with foam tape for dimension.

Voila, a pretty and elegant wedding card!  :)

Stamps:  none
Ink:  none
Paper:  White (Papertrey Ink)
Misc:  Quick Stitch Sentiments die, Petite Pots die (Papertrey Ink); Cream pearl pen (Viva); white embroidery floss (DMC); #032 fine braid metallic thread (Kreinik); foam tape

Friday, August 28, 2015

Stamp-a-Faire 2015: Friday Night Fashion Show

It's time for Papertrey Ink's annual Stamp-a-Faire!  My daughter Emily and I look forward to this event every year.  This time the theme is Project Stamp-a-Faire, a paper fashion extravaganza.  We were challenged to decorate a white t-shirt for tonight's opening event, so we've been working on ours for the past few days.


Actually, I should say that I took a few days.  Emily whipped hers out after school today.  I wish I had that girl's gumption and fearlessness!


My vision was much greater in my head, but I ended up keeping it simple in the end.  I used an old Fabrico inkpad to stamp the large flower from Friends 'Til the End in the center of my shirt and then added two smaller blossoms from Garden of Life on each side.  Because my inkpad was old and bit faint, I traced over the flower outlines with a black fabric marker.  Then I colored them in with other fabric markers.  Pretty simple!  It just took me some time because of my perfectionism.  lol


I accidentally got a  black smudge on the shirt from the corner of my acrylic block.  Nooooo!  That set me back a day trying to figure out what to do.  My daughter got the brilliant idea to add a bee next to the flower, and this cute image from Honey Bees worked perfectly.  Shirt saved!  :)


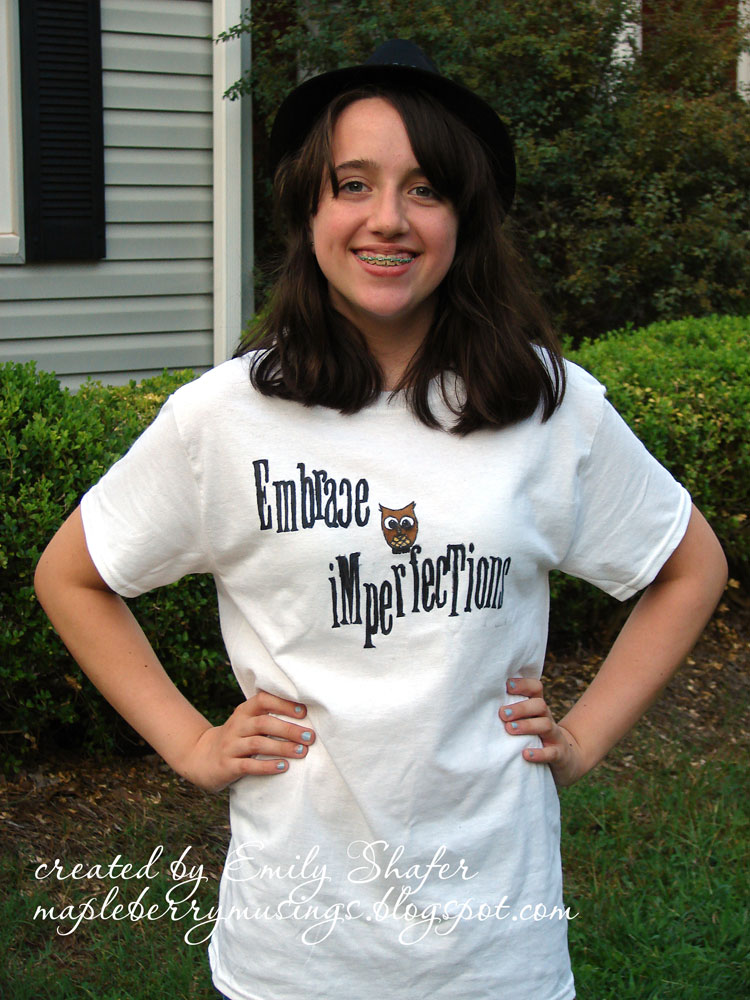
I actually like Emily's shirt much better than mine!  She took some old foam alphabet stamps that I've had for years and stamped the sentiment "Embrace imperfection" using my Fabrico inkpad.  She then went over each letter with a black fabric marker.  She intentionally made mistakes.  Love this girl!


She stamped an owl using stamps from Wise Owl and Wise Owl Bellies, coloring it with fabric markers.  It turned out pretty cute!  Did I mention I love this girl?  She teaches me so much.   :)


We can't wait to get started with all the fashion-themed challenges tomorrow.  Here's to a fun-filled stampy weekend!

Stamps:  Friends 'Til the End, Garden of Life, Honey Bees, Wise Owl, Wise Owl Bellies (Papertrey Ink); Philadelphia foam stamps (Making Memories)
Ink:  Real Black (Fabrico)
Misc:  fabric markers (Tulip); white t-shirts